Add An Animated Twitter Bird To Your Blog

Friday, August 31, 2012


Today I'm going to show you how to add that cute little twitter bird that flies around your blog and lands somewhere once you stop scrolling, I've seen them around and I think they are adorable. Twitter is one of the biggest social networking sites used by bloggers so it's a great way to get your readers attention and gain followers.


Note: Like any other HTML editing, backup your template. Click Design > Edit HTML > Download Full Template and save it to your computer.


Add Flying Bird to Post Pages Only;


Find the following code in your template (Ctrl F/ Cmd F)


</body>


And paste the following code directly underneath it

<b:if cond='data:blog.pageType == &quot;item&quot;'>
<!-- Twitter Bird Widget for Blogger by Way2blogging.org -->
<script type="text/javascript" src="http://bloggerblogwidgets.googlecode.com/files/way2blogging.org-tripleflap.js">
</script>
<script type="text/javascript">
var twitterAccount = &quot;Your Twitter User Name Here!&quot;;
var tweetThisText = &quot; <data:blog.pageTitle/>: <data:blog.url/> &quot;;
tripleflapInit();
</script>
<span style="font-size:11px;position:absolute;"><a title='Blogger Widget by Way2blogging.Org' href="http://www.way2blogging.org" target='_blank'><img border='0' src='http://img1.blogblog.com/img/blank.gif'/></a></span><a href="http://www.spiceupyourblog.com" target="_blank">Twitter Bird Gadget</a>
<!-- Twitter Bird Widget for Blogger by Way2blogging.org -->
</b:if>


Add you username, not the entire url. Save template.


Add Flying Bird to All Pages;


Find the following code in your template (Ctrl F/ Cmd F)

</body>

And paste the following code directly underneath it


<!-- Twitter Bird Widget for Blogger by Way2blogging.org -->
<script type="text/javascript" src="http://bloggerblogwidgets.googlecode.com/files/way2blogging.org-tripleflap.js">
</script>
<script type="text/javascript">
var twitterAccount = &quot;Your Twitter User Name Here!&quot;;
var tweetThisText = &quot; <data:blog.pageTitle/>: <data:blog.url/> &quot;;
tripleflapInit();
</script>
<span style="font-size:11px;position:absolute;"><a title='Blogger Widget by Way2blogging.Org' href="http://www.way2blogging.org" target='_blank'><img border='0' src='http://img1.blogblog.com/img/blank.gif'/></a></span><a href="http://www.spiceupyourblog.com" target="_blank">Twitter Bird Gadget</a>
<!-- Twitter Bird Widget for Blogger by Way2blogging.org -->


Add you username, not the entire url. Save template.


Twitter have now release a one click follow button like this one below


You can check it out on twitters resources page.


read more " Add An Animated Twitter Bird To Your Blog "

Adding a Share Button

Thursday, August 30, 2012

Read more ...
read more " Adding a Share Button "

Disable Right Click


Todays tutorial is how to disable right click on your blog. I find this really annoying because I like to open different pages in a new tab, however sometimes it is necessary to avoid people taking your photos and copying text. So read on if you want to know how to do it.

Layout > Add Page Element > HTML/Javascript

and enter the following code

<SCRIPT language=JavaScript>
<!-- http://www.spacegun.co.uk -->
var message = "function disabled"; 
function rtclickcheck(keyp){ if (navigator.appName == "Netscape" && keyp.which == 3){ alert(message); return false; } 
if (navigator.appVersion.indexOf("MSIE") != -1 && event.button == 2) { alert(message); return false; } } 
document.onmousedown = rtclickcheck;
</SCRIPT>

If you wish to edit what text comes up, change function disabled to whatever you wish. Example: Right click is disabled on this blog.

Save & Test.

A box should appear when you right click with your message.

(Code Source)


Read more ...
read more " Disable Right Click "

Add Social Media Links beneath each Post

Wednesday, August 29, 2012

I was asked by Jessica how I got the links under my posts, so todays post is a tutorial on how to add your social networking links under each blog post. First things first, BACKUP your template.

Template > Backup/Restore > Download Full Template


Template > Edit HTML > Proceed > Tick "Expand Widget Templates" >

CTRL F (PC) or CMD F (Mac) & Search for <data:post.body/>

Under <data:post.body/> paste <div class='sociallinks'> </div>

Now you add your links between <div class='sociallinks'> & </div>, you can add buttons here or plain links like I've done.

To Add a Link with an Image;
<a href="LINK URL" target="_blank"><img src="IMAGE URL" border="0" alt="DESCRIPTIVETEXT"></a>

Read more ...
read more " Add Social Media Links beneath each Post "

Center Tabs for Pages

Monday, August 27, 2012

Todays tutorial is to center page tabs below your header. Its really quite simply & easy to do, first thing is to add pages gadget and place it under your header.


Click Design > Template Designer > Advanced > Add Css & Paste the following code;

.PageList {text-align:center !important;}
.PageList li {display:inline !important; float:none !important;}


Click enter, then apply to blog.


Alternative

If this doesn't work, you could always add this code, to push the tabs over

#PageList1 {
position: relative;
left: 50px;

}

Press preview, Change this number to whatever suits your blog.


Read more ...
read more " Center Tabs for Pages "

Adding a Signature to your Blog Posts

Todays tutorial is on adding your signature below every blog post in blogger. You first need to design your image. Once you have that done upload it to Photobucket, Flickr, Tinypic, etc.

Step 2: Coding


Design > Edit HTML > Tick Expand Widget Templates


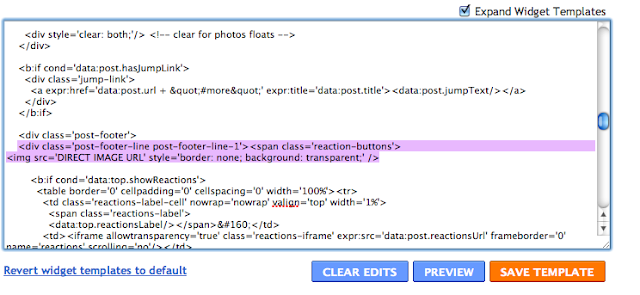
(*) Search (CTRL F/CMD F) for the line which contains something similar to


"post-footer-line post-footer-line-1


Step 3


Directly under that line, paste the following


<img src='DIRECT IMAGE URL' style='border: none; background: transparent;' />


Paste the DIRECT IMAGE URL from Photobucket/Flickr/Tinypic/Etc. here


Please Note


If your blog background isn't white and you have created a transparent background on your signature image, make sure you save it to .PNG before uploading to your image host site.


Centering the Signature


If you want to center this, find where your posts are styled (it will be found at the top of your html code, possibly under a heading "posts") and paste the following;

.post-footer-line-1 {
text-align:center; }


And Save...


Finally, save your template and the image should appear beneath your blog post :)

(*) EDIT: Alternative Step 2 - Easier in my opinion.

Find the following code 


<div class='post-body entry-content'>
      <data:post.body/>


And paste this code beneath it.

<div class='sign'>
<img src='DIRECT URL HERE' style='border: none; background: transparent;'/>
</div>

Paste the DIRECT IMAGE URL from Photobucket/Flickr/Tinypic/Etc. here


If you want to center this using alternative step 2, find where your posts are styled (it will be found at the top of your html code, possibly under a heading "posts") and paste the following; 

.sign
{ text-align: center;}


Read more ...
read more " Adding a Signature to your Blog Posts "

Enlarging Blogger Profile Image

Sunday, August 26, 2012


I got asked how to make the profile picture in the About Me gadget bigger, unfortunately Blogger set this to default 80 x 80px. I searched around a found a way to edit this in order to make the picture bigger.

Step 1


Dashboard > Edit Profile >Photograph >


and upload your photo, make sure it's the right size, as in make sure its a large image. Otherwise when we enlarge it, it will be pixelated!

Step 2


Design > Page Elements > Add a gadget > Profile


Fill in your details and position it where you want on your blog in the Design > Page Elements.

You can see below that the image is small, so now we have to edit this.


Step 3


To edit this, click Design > Template Designer > Advanced > Add Css & add the following code

.profile-img{
height: auto;
width: 200px;
}

You can edit this number to whatever suits you and your blog layout.


Then press enter & click apply to blog. You can see from the image below that my profile picture is now larger.


Read more ...
read more " Enlarging Blogger Profile Image "

Social Buttons - Glitter

Saturday, August 25, 2012


20 Social Media Icons with a Glitter Background - Pinterest | Youtube | Vimeo | Twitter | Tumblr | Shopping Cart | Rss Feed | Camera | Linked In | Home | Email x3 | Facebook | Feedburner | Instagram | Scissor Symbol fot DIY/Crafts | Download | HelloCotton | Person for About Me

Size; 58x58 px


Download Silver Glitter Buttons FREE.


(*) Colours available;
Rainbow Light | Rainbow | Ombre | Orange | Mint | Bronze | Gold | Green |Light Blue | Blue | Purple | Red | Rose | Pink | PinkGrey | NEW! Lavender

* Will update download links April 2013, contact me if interested in getting coloured versions


glitter social networking buttons media icons links blogging twitter facebook pinterest blogger hellocotton rss instagram youtube tumblr silver rainbow color gold pink blue green purple red rose ombre
Read more ...
read more " Social Buttons - Glitter "

Auto adjust size of images


The lovely Hayley asked me if there was a way to automatically adjust images in your blogposts, after some research, altering and testing, I've found a way to do so.

Firstly check the size of your main post width, click Design > Template Designer > Adjust Widths. It will show your overall width and your sidebar width, so take the sidebar from the overall and you'l know more or less what the post width is. (includes padding/margins etc)

Design > Edit HTML > Download FUll Template as a backup in case you make a mistake.

Find the following (or similar depending on what template you are using)

]]></b:skin>

(Use CTRL & F to search or CMD & F on MAC keyboard to Search)

Just above that, paste the following

Read more ...
read more " Auto adjust size of images "

Removing Shadow or Border from Blog Post/Content

Thursday, August 16, 2012

Read more ...
read more " Removing Shadow or Border from Blog Post/Content "

Remove Shadow & Border from Photos

Read more ...
read more " Remove Shadow & Border from Photos "

Setting Images/Photos as Links

I got asked this the other day so I thought I'd do a quick post about it. This can be used for buttons, photos...any image that you want to link to somewhere else, be it another website, a blog post, a certain label, anywhere.


Layout > Add a Gadget > HTML/Javascript.


The code


<a href="URL LINK" target="_blank"><img src="IMAGE DIRECT ADDRESS/LINK" border="0" alt="DESCRIPTION"></a>


URL LINK - The link to the post/tag/label/website or whatever it is you want to link to.

IMAGE DIRECT ADDRESS/LINK - The address/link of the image itself, should be hosted somewhere such as shutterfly, tinypic, photobucket, flickr, etc.

DESCRIPTION - Of the Link/Image.

Add Multiple Images


To add another image, simply add it again underneath so it looks like...

<a href="URL LINK1" target="_blank"><img src="IMAGE DIRECT ADDRESS/LINK1" border="0" alt="DESCRIPTION"></a>
<a href="URL LINK2" target="_blank"><img src="IMAGE DIRECT ADDRESS/LINK2" border="0" alt="DESCRIPTION"></a>

To use a Tag/Label as a Link


Click the label which you want to create a link for, so whatever label/tag you've given it. Copy the URL link which should look something like;
yourblogname.blogspot.com/search/label/yourlabelname
As you can see under my blog post title, it says "posted in: Tutorials" so my link would be 
http://missedesign.blogspot.com/search/label/Tutorials
Simply use this as your URL for the image


It's that simple!


You can see a table of contents of all tutorials here & learn how I used the above coding to make social media buttons that change once you hover over them here.

Read more ...
read more " Setting Images/Photos as Links "

Social Media Buttons (& add Hover Effect)

Social Media/Networking Buttons are a great way of getting peoples attention as well as saving space on your blog or website. You want them to look nice, stand out and fit your blog. This tutorial will go through how to instal them onto your blogspot blog and how to add a hover effect.

So, first step... Get your Buttons


A quick Google search "social networking buttons" will throw up loads of results. Such as this site with 55 different buttons or this site with standard buttons. You need to be careful of copyright when getting buttons this way.

You can also get buttons from my design shop (by clicking store above) or check out the freebies available on this blog.

Upload Buttons


You need to upload the buttons to a hosting site, such as Tinypic. This will give you the image link to then use in your html code.


In Blogger


Click design, page elements & Add a gadget. Scroll down until you see "HTML/Javascript". *


NOTE: If you have the updated blogger, this may look different. 
Click Layout > Add A Gadget >HTML/Javascript


HTML Code


<a href="Insert website/profile link here" target="blank" title="Description of link/website"> <img src="Direct URL of image" border="0" /> </a>  


*4b. If you want the image to change to another image when you hover/roll over it like I have, use the following code;


<a href="Insert website/profile link here" target="blank" title="Description of link/website">
<img src="Direct URL of image" border="0" onmouseover="this.src='Image url link of image used when hover'" onmouseout="this.src='Image url link of what you want it to return to'" /> </a>  


Using Tinypic


The URL image link is the "Direct link for layouts", it should look something like this, depending on what hosting site you are using.


Eg. So altogether mine looks like; 


<a href="http://twitter.com/misseblog" target="blank" title="Follow tweets by Misse">

<img src="Image url link of what you can see" border="0" onmouseover="this.src='Image url link of image used when hover'" onmouseout="this.src='Image url link of what you want it to return to'" /></a> 
which gives me this;


Simply Save & Test


All beside each other?

If you write the code for each link one after another, blogger should automatically place them beside each other, until you run out of column space. Then it will go to the line below.


How to Center them?

If you want to place them in the center, just add <center> before the code and </center> after. Example:

<center>

<a href="Insert link here" target="blank" title="Description of link">
<img src="URL of image" border="0" /> </a>  
</center>


Hope this helped, any questions, please let me know! Take your time with it and carefully copy&paste the urls xox


Check out how to link images/pictures to pages/websites.

Read more ...
read more " Social Media Buttons (& add Hover Effect) "

Create a Drop Down Navigation Menu

Wednesday, August 15, 2012

This post has been updated and can be found on - http://xomisse.com/create-a-drop-down-navigation-menu/
Read more ...
read more " Create a Drop Down Navigation Menu "

Guide to Rockmelt - Browser & Social Networking

Wednesday, August 1, 2012

Guide tutorial how to use rockmelt best browsers productivity productive social media

I wrote a little about Rockmelt browser in this Best Browsers post. It is definately one of my favourite browsers and I know a lot of people that have switched over to it since I recommended it. It is basically Google Chrome but with added Social Media, allowing you to post and share straight from the browser. If you addicted to Facebook, Twitter, Tumblr, Youtube and everything else, then you'll probably love this! It's now available for your iPhone and iPod Touch and they are working on it for the iPad and for Android. Visit Rockmelts Website for more information and to download the browser.


Special Features
  • Built in chat, so you can stay in touch with friends.
  • A share buttons which lets you post to many different sites, update your Facebook status, Twitter, Tumblr, add to Gmail or post on a friends wall.
  • Automatic sync so you can login from anywhere.
  • Add RSS Feeds, Apps or Websites and receive instant updates & news.
  • Choose a theme, add widgets and everything else available on Chrome.

  Guide tutorial how to use rockmelt best browsers productivity productive social media

1. Compose

Update your status, post to Facebook Walls, Send Messages, Send to Gmail, Tweet and so on, all from this button.

  • Find it in the upper left hand corner, click it and a box will appear.
  • In the To: area, add in wherever or whoever you want to post it to.
  • Add Comments, Links, Location and click Share

2. Share

Like on many smartphones, you can quickly share the page you're looking at. It also gives you the option to add a comments. Simply click the Share button and the link is automatically added, all you have to do is decide where to share it.


3. App Center

This is my favourite feature, you get instant updates from the sites you've added. You can add Apps, Websites or even RSS Feeds. As you surf the web, if a webpage has an Apps, it will be suggested. Just click to instal. Once it's on your panel, click it to reveal a slide out box will all updates from that site. You can also click on the add button and search for what you like.


4. Favourite Friends

We all have those people we always talk to online, so why not keep them at the top of the chat box. 
  • Click on the expand button on the bottom of your friend edge.
  • Search for your fav friends, click the star next to them.
  • The gift icon will invite your friends to Rockmelt.

5. View Later

Bookmarking "I need to read this but don't have time right now" pages is handy, but they build up and cause an overflow of clutter in your bookmarks bar. Be honest, how often do you go back to find it so you can read it? With this, you create a reading list, once read you can simply remove it.
  • When on a page you want to read later, click the clock in the URL bar or click on the clock underneath an item in your app feed. 
  • Click the clock in the App Edge and see everything you've added.

6. Facebook

Facebook is built in to Rockmelt, although I'm hardly ever on Facebook anymore it's a handy thing to have. I mostly use it to check for college updates so Rockmelt tells me without having to use another tab. Confirm friend requests, send/reply to messages and get instant notifications from your Rockmelt browser.


7. Social Omnibox

Message friends, post on their wall and open apps, all from Rockmelt.
  • Type your friends name or App into the search bar.
  • Click View Profile, Message, Write on Wall. View site or open App.

8. Quiet Mode

No more distractions. Turn on Quiet Mode by clicking the bell in the upper right hand corner, this will hide your App & Friend Edges, go offline in chat and disable notifications so you can get some work done. When your finished, turn Quiet Mode off again.


Change Preferences

Change how you get notified, app behavior, edge positioning, social reading and much more by clicking Rockmelt & Preferences. 

Want Even More?

Check out Google Chromes Webstore to add extensions (widgets/apps/themes/etc) to your Rockmelt Browser. Look out for reviews of some of my favourites coming soon.

Have you tried Rockmelt? What do you think about the features?

Check out some of my favourite browsers in this post. If you liked this post and find this blog useful, please share it! xo

Read more ...
read more " Guide to Rockmelt - Browser & Social Networking "