 Adding a Signature to your Blog Posts
Todays tutorial is on adding your signature below every blog post in blogger. You first need to design your image. Once you have that done upload it to Photobucket, Flickr, Tinypic, etc.
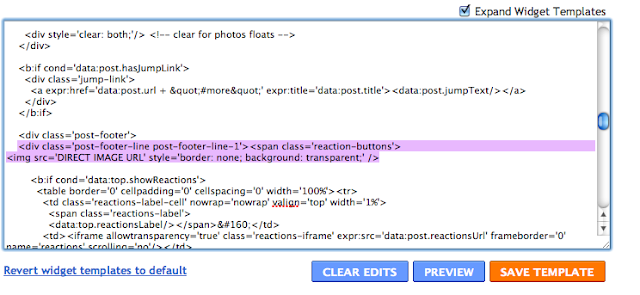
Design > Edit HTML > Tick Expand Widget Templates

(*) Search (CTRL F/CMD F) for the line which contains something similar to
"post-footer-line post-footer-line-1"
Directly under that line, paste the following
<img src='DIRECT IMAGE URL' style='border: none; background: transparent;' />
Paste the DIRECT IMAGE URL from Photobucket/Flickr/Tinypic/Etc. here
If your blog background isn't white and you have created a transparent background on your signature image, make sure you save it to .PNG before uploading to your image host site.
If you want to center this, find where your posts are styled (it will be found at the top of your html code, possibly under a heading "posts") and paste the following;
Finally, save your template and the image should appear beneath your blog post :)
Find the following code
<div class='post-body entry-content'>
<data:post.body/>
And paste this code beneath it.
Paste the DIRECT IMAGE URL from Photobucket/Flickr/Tinypic/Etc. here
If you want to center this using alternative step 2, find where your posts are styled (it will be found at the top of your html code, possibly under a heading "posts") and paste the following;
.sign
{ text-align: center;}
Step 2: Coding
Design > Edit HTML > Tick Expand Widget Templates

(*) Search (CTRL F/CMD F) for the line which contains something similar to
"post-footer-line post-footer-line-1"
Step 3
Directly under that line, paste the following
<img src='DIRECT IMAGE URL' style='border: none; background: transparent;' />
Paste the DIRECT IMAGE URL from Photobucket/Flickr/Tinypic/Etc. here

Please Note
If your blog background isn't white and you have created a transparent background on your signature image, make sure you save it to .PNG before uploading to your image host site.
Centering the Signature
If you want to center this, find where your posts are styled (it will be found at the top of your html code, possibly under a heading "posts") and paste the following;
.post-footer-line-1 {
text-align:center; }
And Save...
Finally, save your template and the image should appear beneath your blog post :)
(*) EDIT: Alternative Step 2 - Easier in my opinion.
Find the following code
<div class='post-body entry-content'>
<data:post.body/>
And paste this code beneath it.
<div class='sign'>
<img src='DIRECT URL HERE' style='border: none; background: transparent;'/>
</div>
If you want to center this using alternative step 2, find where your posts are styled (it will be found at the top of your html code, possibly under a heading "posts") and paste the following;
.sign
{ text-align: center;}